RANE SIXTY FOUR
SETUP
Connections
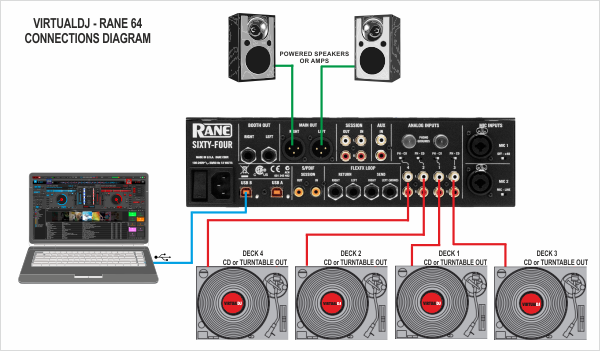
- Connect your computer to USB A (or B) port at the rear panel of Rane Sixty-Four
- Connect each of your deck’s RCA cables to ANALOG INPUTs 1.to 4 respectively, depending on which software deck you wish to control.
If it’s a CD player, select CD with the switch above the input jacks.
If it’s a turntable, select PH (Phono) with the switch above the input jacks. Secure the ground wire to a Phono Ground terminal. - Set the SOURCE selector at the top panel for DECKs 1 to 4 to A (or B if the USB B port is used).
- Connect the Rane Sixty-Four with AC power using the provided cable and power on the unit
Note: Usage of turntables or CD players (for DVS) is not necessary. The mixer may be used as a pure MIDI mixer. VirtualDJ is also offering the ability to control all the software decks with even with a single timecode unit. See Timecode.
Drivers
Windows: Download and install the necessary ASIO drivers from https://www.rane.com/downloads-legacy#sixty-four
Mac OSX: Download and install the necessary CoreAudio drivers from https://www.rane.com/downloads-legacy#sixty-four
.
.
VirtualDJ 8 Setup
Once VirtualDJ 8 is launched, a Login Window will appear. Login with your virtualdj.com account credentials.
A Pro Infinity or a Pro Subscription License is required to use the Rane Sixty-Four. Without any of the above Licenses, the controller will operate for 10 minutes each time you restart VirtualDJ.
http://www.virtualdj.com/buy/index.html

Click on the “Use Soundcard” button and VirtualDJ will automatically create and apply the pre-defined audio configuration using the built-in audio interface of the Rane Sixty-Four.
Click on the “Change Skin” button and VirtualDJ will automatically load the default 4 Decks GUI.
Click to OK.
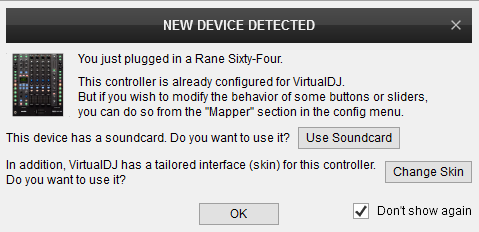
The unit is now ready to operate with VirtualDJ.
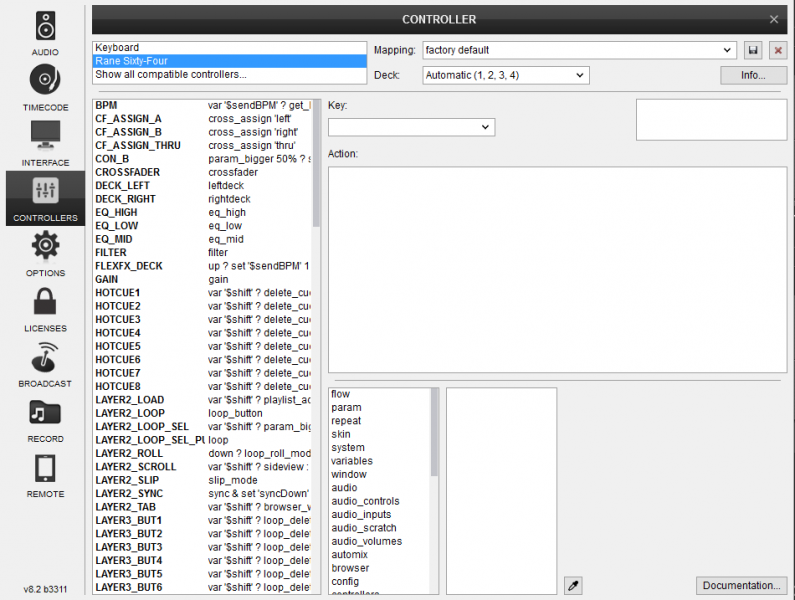
MIDI Operation
The factory default Mapping offers the functions described in this Manual, however those can be adjusted to your needs via VDJ Script actions.
Find more details at
http://www.virtualdj.com/wiki/VDJ8script.html
AUDIO Setup
Timecode (DVS)* configuration is pre-configured (see DVS Support for more details).
*requires Pro Infinity or Pro Subscription License http://www.virtualdj.com/buy/index.html
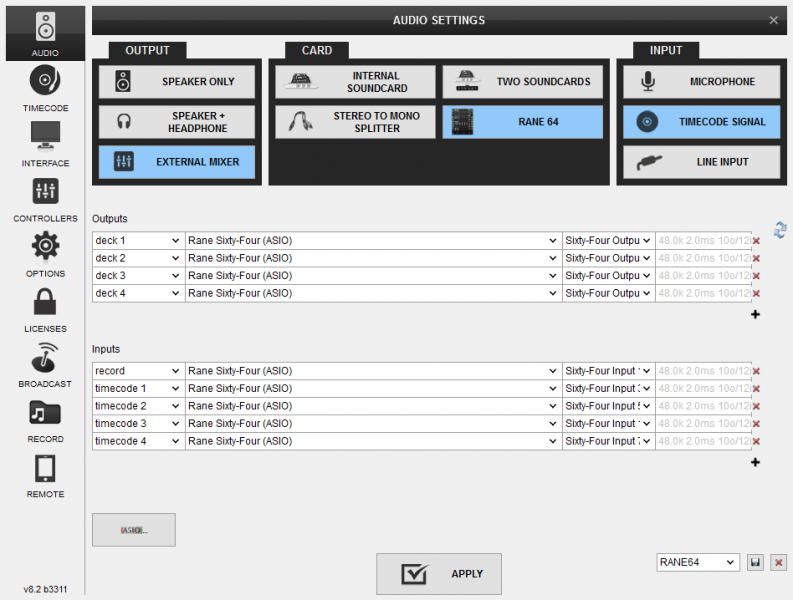
For further software settings please refer to the User Guide of VirtualDJ.
http://www.virtualdj.com/manuals/virtualdj/index.html
LAYOUT

S. SHIFT. Press and hold this button down to access secondary software or hardware functions (mostly in gray lettering) of other controls on the Rane Sixty-Four
The functionality of the Rane Sixty-Two is described in the following chapters
A. Browser & Deck Controls
B. Effects
C. Mixer
D. Outputs
E. Microphone
F. Rear Panel
Browser & Deck Controls

- DECK SELECT. The center channels of the Sixty-Four are wired to Decks 1 and 2 and the outside channels are wired to Decks 3 and 4.
Press the DECK 3/1 button to assign the left-side control strip to Decks 1 or 3 (the CONTROL leds on the top panel of the Rane Sixty-Four will indicate the selection).
Press the DECK 2/4 button to assign the right-side control strip to Decks 2 or 4 (the CONTROL leds on the top panel of the Rane Sixty-Four will indicate the selection). - TAB. Use this button to set focus to the Folders List of VirtualDJ Browser. If focus is on the Folders List, use this button to open/close sub-folders.
Hold SHIFT down and then use this button to set focus to the next Browser window (Folders, Songs and Sideview) - SCROLL/LOAD. Use this encoder to scroll through files or folders (depending on the focused Browser window). Hold SHIFT down and then use this encoder to cycle through the available views of the Sideview (Automix, Sidelist, Sampler, Karaoke and Shortcuts).
- LOOP ENC. Use this encoder to half or double the size of a loop. Hold SHIFT down and use the encoder to move the triggered loop forward or backwards by half the selected size of the loop.
Push the encoder to trigger a loop of a selected size in beats. - LOOP BUT. Smart button to trigger a manual loop. Press the button once to set a Loop In (entry) point. Press again, to set a Loop Out (Exit) point and trigger the loop. Press for a 3rd time to exit the loop.
- ROLL. Press and keep this button down to trigger a Loop Roll of a selected size in beats. The size can be adjusted while the button is pressed with the Loop encoder. Size will be memorized for next time and can differ from the size of regular loops.
- SLIP. Use this button to enable/disable the Slip Mode. When Slip mode is enabled, several functions such as scratching, HotCues, loops etc. will act temporary and the track will return to the position it would have been if the action was never triggered
- SYNC. Use this button to synchronize the tempo and phase of this deck with the Master Deck. The Master Deck is smart-selected by VirtualDJ (in most cases it will be the deck that plays out live), but can be manually set as well using the M buttons from the VirtualDJ GUI.
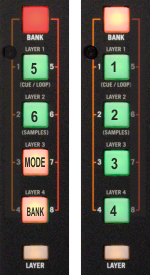
- BANK. Use this button to toggle between the 2 available Banks for the 4 numbered buttons.
- BUTTONS (1-8). The 4 numbered buttons offer different functionality, depending on the selected Bank and Layer.
- LAYER. 4 different Layers (HotCues, Sampler, Saved Loops and Quick Loops – see below) are offered for the numbered buttons. Hold this button down and then press one of the 4 numbered buttons to select a different Layer.
Note that all the above deck controls (TAB, SCROLL, LOOP, SYNC and SLIP) can offer different functionality depending on the selected Layer (as they offer separately named Keys), however those have been pre-assigned to offer the same function regardless the selected layer. This may be changed by customizing the assigned actions. - PHONES SOCKET. Connect your Headphones to this socket
HotCues (Layer 1)
In this mode, each one of the 4 numbered buttons triggers a HotCue (1-8) or assigns a HotCue if not assigned at the track’s current position.
When a Hot Cue Button is unlit (dimmed amber), you can assign a Hot Cue Point by pressing it at the desired point in your track. Once it is assigned, the Hot Cue Button will light up bright amber.
When Bank 1 is selected (BANK Led orange), use these buttons to control HotCues 1 to 4.
When Bank 2 is selected (BANK Led red), use these buttons to control HotCues 5 to 8.
Hold SHIFT down and then use these buttons to delete the assigned HotCues.
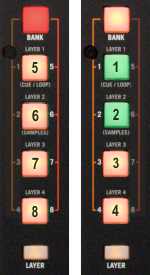
Sampler (Layer 2)
In this mode each the numbered buttons can trigger up to 12 samples from the selected Sampler Bank of VirtualDJ.
The leds of those buttons will be turned off if the corresponding slot is unloaded, dark green if loaded and bright green if playing
When Bank 1 is selected (BANK Led orange), use these buttons to trigger Samples 1 to 4.
When Bank 2 is selected (BANK Led red), use the first 2 top buttons to trigger Samples 5 to 6.
If a Sampler Bank has more than 6 samples, the left side of the Sixty-Four will control samples 1 to 6 and the right side will control samples 7 to 12. If a Sampler Bank has less than 7 samples, both sides will control the same samples.
Depending on the selected Trigger mode, hold SHIFT and then use the same buttons to stop the playing sample.
Use the numbered button 8 (in Bank 2) to select and load the next Sampler Bank. Hold SHIFT down and then use the same button to select and load the previous Sampler Bank.
Use the numbered button 7 (in Bank 2) to select the next Sampler trigger mode. Hold SHIFT down and then use the same button to select the previous trigger mode.
Sampler Output Channel.
By default VirtualDJ will send Sampler to all 4 Channels. You may explicitly route Sampler to a specific deck using the Sampler Options from VirtualDJ GUI, providing the ability to apply Effects, adjust the EQ and control its Output volume from the Sixty-Four.
Saved Loops (Layer 3)
In this mode each the numbered buttons stores and triggers (if saved) a Saved Loop. Up to 8 Saved Loops can be stored and recalled, depending on the selected Bank.
Use the numbered buttons to save a Loop into one of the 8 available slots. The loop will have the current playing position and the currently selected size in beats. The Led will light bright orange if a Loop is stored.
Hold SHIFT down and then use these buttons to delete a saved Loop.
If a Loop is stored, use the same buttons to trigger the saved Loop (and jump to that position if different from the current). Led sill become bright green while triggered.
Use the LOOP BUT to exit the Loop.
When Bank 1 is selected (BANK Led orange), use these buttons to save and trigger Loop slots 1 to 4.
When Bank 2 is selected (BANK Led red), use these buttons to save and trigger Loop slots 5 to 8.
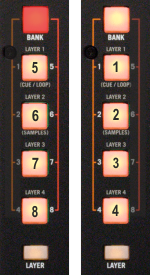
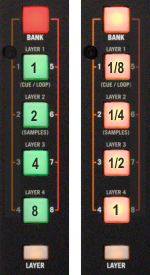
Quick Loops & Rolls (Layer 4)
In this mode each the numbered buttons triggers a Loop or a Loop roll of a pre-selected size in beats, depending on the selected Bank.
When Bank 1 is selected (BANK Led orange), each one of the 4 numbered buttons, triggers a momentary Loop Roll of 1, ½, ¼, and 1/8 beats as per the image.
Leds will become bright amber while the corresponding Loop Roll is triggered.
When Bank 2 is selected (BANK Led red), each one of the 4 numbered buttons, triggers a Loop of 1, 2, 4 and beats as per the image.
Leds will become bright green while the corresponding Loop is triggered.
EFFECTS
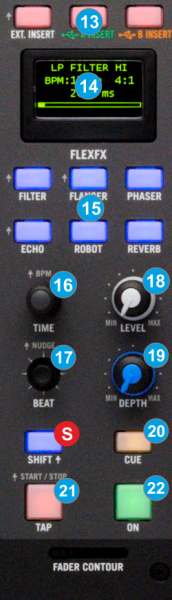 The Effects section of the Rane Sixty-Four is offering a variety of high-quality hardware effects that can be applied to any of the 4 available decks and both Microphone Inputs.
The Effects that come with VirtualDJ can be applied to any of the 4 decks as well, using the corresponding Effect buttons from the GUI or an additional MIDI device and will be applied before the hardware effects.
In order the applied hardware Effects to be synchronized with the track’s beat pattern, VirtualDJ sends the values of all 4 software decks to the Rane Sixty-Four.
The Rane Sixty-Four will then use the value of the sent deck’s BPM on which the FLEXFX button was engaged last.
A small S (Software) indicator next to the BPM value will flash on the LCD display (14) when received from the software.
The functionality of this section is briefly described below. Please refer to the Manual of the Rane Sixty-Four for a detailed description.
- FX INSERT. Use this button to allow external Insert signal (from USB or SEND/RECEIVE inputs). VirtualDJ is not supporting this feature, so make sure these are off.
- LCD Display. Displays information for the Effects and the selected Layer for each mixer channel.
- EFFECTS. Use these 6 buttons to select one of the available hardware effects.
- FX TIME. Use this knob to fine adjust the time (affects the Beat pattern) or other parameter of the applied Effect.
- FX BEAT. Use this joystick to select the Beat pattern that the selected Effect will use.
- FX LEVEL. Use this knob to adjust the Output level of the applied Effect. Note that this will also affect the overall output volume of the deck on which the Effect is applied.
- FX DEPTH. Use this knob to adjust the depth of the applied/selected Effect
- CUE. Use this button to send the FLEXFX Output to the Prelisten Channel (to monitor how the Effect applies on a deck prior mixing)
- TAP. Use this button (tap on beat) to manually calculate the BPM of the playing track and let the Sixty-Four to use this value instead of the sent software one.
- FX ON. Use this button to turn on/off the selected Effect and apply to the selected deck, or microphone channel.
Mixer
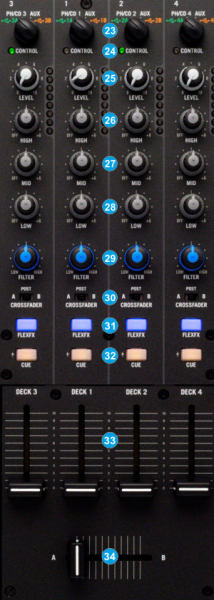
- USB/INPUT SEL. Set this selector to the appropriate position to define which Channel Input will be routed to the 4 Mixer Channel Outputs (DECK 1 to DECK 4).
On USB A or USB B position, the audio signal from the computer connected to the USB A or USB B port (rear panel) will be routed to the Output of this Mixer Channel.
On PH/CD position the audio signal from the Inputs (1, 2, 3 and 4 at the rear panel) will be routed directly to the Output of this Mixer Channel. In this case the sound from the computer’s decks will be muted. Use this position to route external analogue media sources.
On AUX position the audio signal from the AUX Input at the rear panel will be routed directly to the Output of this Mixer Channel. In this case the sound from the computer’s decks will be muted. Use this position to route external analogue media sources. - CONTROL LED. Indicates which deck (1 or 3 for the left side and 2 or 4 for the right side) is assigned to the Left and Right Deck Controls section. Selection is done from the DECK buttons (1)
- LEVEL. Adjusts the input audio level (gain) up to +15db of the left and right mixer channel. No boost or cut is at 12 o’clock position.
- HIGH. Full-cut isolator to adjust the high (treble) frequencies of each mixer channel.
- MID. Full-cut isolator to adjust the middle (mid) frequencies of each mixer channel
- LOW. Full-cut isolator to adjust the low (bass) frequencies of each mixer channel.
- FILTER. Applies a High-Pass / Low-Pass Filter on each mixer channel.
- CF-ASSIGN. Define on which side of the crossfader each mixer channel will be output. If the POST option is selected, the corresponding deck will be heard regardless the crossfader’s position.
- FLEXFX. Use this button to route the applied Hardware Effect on each mixer channel
- CUE. Press these buttons to send a channel's pre-fader signal to the Headphones Channel for monitoring. When engaged, the button will be lit.
By pressing one CUE button at a time, you will cue that channel alone (and deactivate CUE monitoring for the other channels). To cue to more than 1 channel simultaneously, press these channels’ CUE buttons at the same time. - VOLUME. Use these faders to adjust the Output Volume of each mixer channel.
- CROSSFADER. Blends audio between the left and right assigned channels/decks.
Notes
- The CUE buttons of the Sixty-Four will not control the PFL buttons of the VirtualDJ GUI (hardware operation), nor will the PFL buttons will define which channel is sent to the Phones channel of the Rane Sixty-Four.
- The Crossfader, Equalizer, Filter and Volume faders will move the relative faders of the VirtualDJ GUI, but not vice versa (Fake mixer mode)
Outputs

- MAIN MIX. Use this knob to control the Output level of the Master Output.
- NON PGM MIDI. As noted all software controls on the 2 side strips are routed to USB Port A or B according to the Deck Input selectors. All other controls dedicated to mixer functions are sent to USB Port A or B according to the status of this buttons (Green for USB Port A and orange for USB Port B).
- BALANCE. Use this knob to balance between the left and right signals of the Stereo signal
- BOOTH VOLUME. Use this knob to control the Output level of the Booth Output.
- SESSION OUT. Use this knob to control the Output level of the Session Output.
- SESSION IN. Use this knob to control the level of the Session Input.
SESSION IN and OUT are typically used to chain mixers together, through any line-level device may be connected to the Session Input and mixed here. - SPLIT CUE. When enabled (Led bright) the PAN knob (42) will pan between Mono Cue in the left ear and mono Main Mix in the right ear.
- PHONES PAN. Use this knob to mix between CUE and Program MIX in the Headphone channel. When all the way to the left, only channels routed to Headphones (via the CUE buttons) will be heard. When all the way to the right, only the Program mix will be heard.
- PHONES LEVEL. Use this knob to set the volume to the Headphones Channel
Two Headphones 1/4” sockets (at the top and front panels) are available to connect your headphones for monitoring.
Microphone & Video Controls
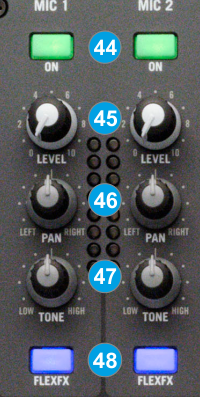 The Rane Sixty-Four offers 2 independent Microphone Input Channels (connections at the rear panel) with Level, Pan and tone controls and the ability to apply Hardware Effects via the FLEXFX buttons.
 - MIC ON. Use these buttons to turn on/off the Microphone Inputs.
- MIC LEVEL. Use these knobs to adjust the output level of the microphone inputs.
- MIC PAN. Left-right Pan (balance) control for both microphone inputs
- MIC TONE. Spectral tilt Tone control. Increasing highs reduces lows by the same amount and decreasing highs increasing lows by the same amount.
- MIC FLEXFX. Use these buttons to route the applied hardware FLEXFX effect to the microphone inputs.
Bypass Mode
The 2 Microphone sections of the Rane Sixty-Four do not control the Microphone section of the VirtualDJ GUI (Master panel) and vice versa. However, the entire Microphone sections can be used as MIDI controls. If you do not use both MIC sections you can independently bypass the controls of this section so that they do not affect audio and only output their MIDI assigned functions.
To toggle MIC bypass mode, hold the SHIFT button and then press any of the MIC ON buttons (44). The led will flash to indicate the MIC bypass mode selection.
Rear panel
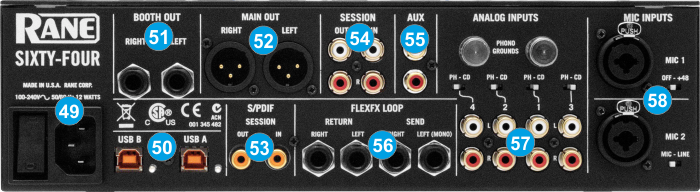
- POWER. Connect the supplied universal AC cord. Power on the unit after all the necessary connections are done.
- USB A/B. These USB connections send and receive audio and control information from the connected computers. See more details in Back to Back.
- BOOTH OUT Use a pair of balanced ¼“ TRS jacks to connect the unit with your secondary output (e.g. for monitor). The level of this output is controlled by the BOOTH knob at the top panel
- MAIN OUT. Connect your amplifier using a pair of balanced XLR jacks. The level of this output is controlled by the MAIN knob at the top panel
- S/PDIF. S/PDIF Input and Output. Used to digitally link mixers without converting to analog.
- SESSION IN/OUT. Use standard RCA cables for the connections. The level of both Input and Output are controlled by the SESSION IN and OUT knobs at the top panel. These can be used to for connecting two mixer together (chain)
- AUX. Stereo unbalanced Auxiliary Input. Can be selected as input source to any of the 4 Decks.
- FLEXFX LOOP Use balanced pairs of ¼” TS jacks for the SEND and RETURN Inputs. For a mono FLEXFX Send use the Left Output. The FlexFX output is normally used along with the FLEXFX LOOP RETURN input to connect outboard effects.
- ANALOG INPUTS. Four Phono/CD inputs are provided by RCA jacks (one for each Deck/mixer channel). These may be set for PH or CD using the rear panel slide switches. Analogue inputs may be selected as Timecode Inputs. See Timecode (DVS).
Set any unused inputs to CD. Connect your turntable ground wires to the PHONO GOUND posts on the rear when using PH inputs. - MIC INPUTS Connect your microphones using a XLR 3-pin plug, a balanced ¼” TRS plug or unbalanced TS plug. MIC1 offers phantom power. MIC2 may be set as Microphone or Line Input using the MIC-LINE switch on the rear panel. Set this to Line when connecting a wireless receiver.
Note: The Main, Booth and Session outputs arrive from the same “Main Mix” signal. Each one of them has its own LEVEL control at the top panel. Because all signals are identical, users may use any of these outputs as the “Main” output if a different cable type is required for system connection.
Advanced Audio Setup
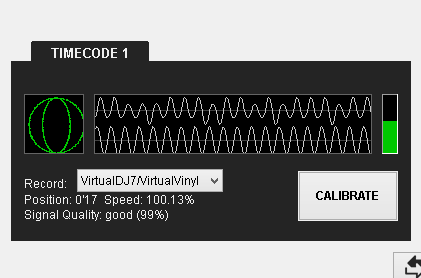
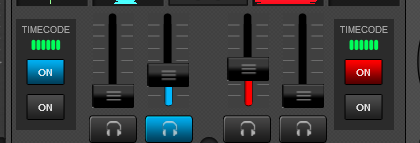
Timecode (DVS)
VirtualDJ is offering DVS (Digital Vinyl System) support for the Rane 64. A Timecode Plus or Pro Infinity license is required. Up to 4 Timecode Inputs are available to control any software decks via Timecode CDs or Vinyls.
All 4 Mixer Channels can accept LINE (Timecode CDs) or PHONO Sources (Timecode Vinyls) depending on the LN/PH switchers at the rear panel of the unit.
- Connect your Timecode devices at the rear panel of the Rane 64 to the Inputs 1 to 4
- Click on the ON buttons from the TIMECODE panels of the Default Skin (in the SCRATCH center panel) to enable the Timecode control to any of the 4 software decks.
- Press PLAY on your timecode CD or Vinyl device and VirtualDJ will automatically detect your Timecode type and make the appropriate adjustments for best performance.
- Open the TIMECODE tab of the VirtualDJ Settings and choose the CALIBRATE button if for any reason the signal is not detected (possibly due to reversed phase connections).
If less than the 4 pre-defined Timecode Inputs need to be used, it is suggested to delete the corresponding Timecode lines from the pre-defined audio configuration and save your custom audio settings as an alternative profile.
Back to back
The Rane Sixty-Four has two USB ports, allowing simultaneous connection of two computers. Each port is completely independent. It is possible to run VirtualDJ on one computer and any other DJ-software on the other, Mac or PC.
How to:
- Connect the 2nd computer to the unused USB port on the Sixty-Four.
- Switch the Input Source on a non-playing mixer channel to the USB source of the 2nd computer.
- Play a track on this deck and mix it when ready – you ll now have audio from both computers during the mix.
- Fade out the audio playing from the 1st computer to the audio playing from the 2nd one.
- When only audio from the 2nd computer is left in the mix, remove the first computer.
- Assign the Input Source for the remaining free mixer channel to the 2nd computer and keep mixing.
Recording
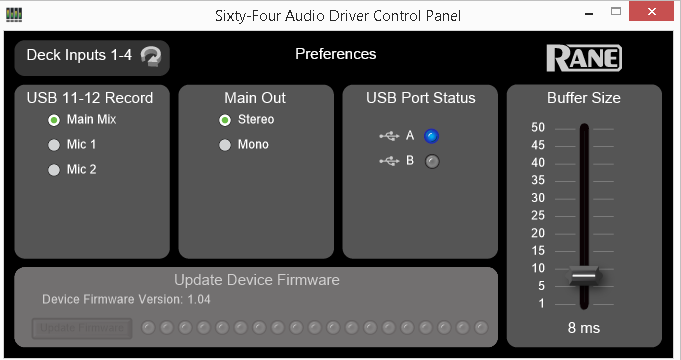
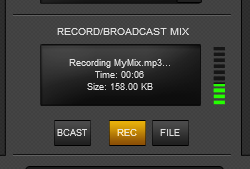
The Rane Sixty-Four has a dedicated Input to record your Main Mix (default setting) or the Microphone Inputs alone. VirtualDJ has pre-configured this input for recording, thus no special setting is required in order to record your mix (including analogue sources and Microphone).
Simply make sure the Main Mix is selected in the Rane Sixty-Four Audio Driver control panel for the USB 11-12 Record Input and use the REC or BSCAST buttons from the MASTER center panel of the VirtualDJ GUI.